|
|
You are here: Foswiki>Tec Web>ItServicesVPN>VPNWin7_en (04 Jan 2013, romans)Edit Attach
VPN PPTP Connection in Windows 7
Schritt-für-Schritt-Anleitung zur Einrichtung einer PPTP VPN Verbindung zum Fachbereich.Step-by-step tutorial for VPN PPTP connection.
Einrichtung der PPTP VPN Verbindung | Create a VPN PPTP connection
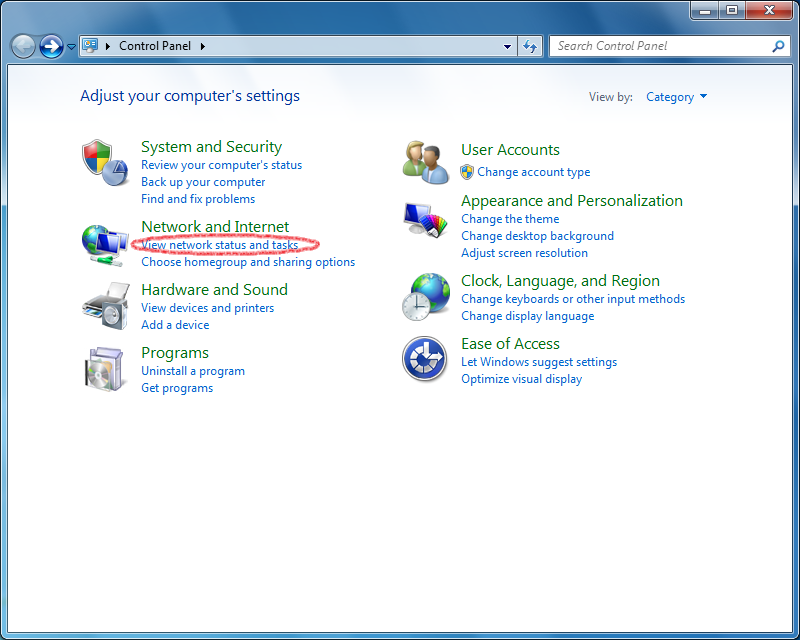
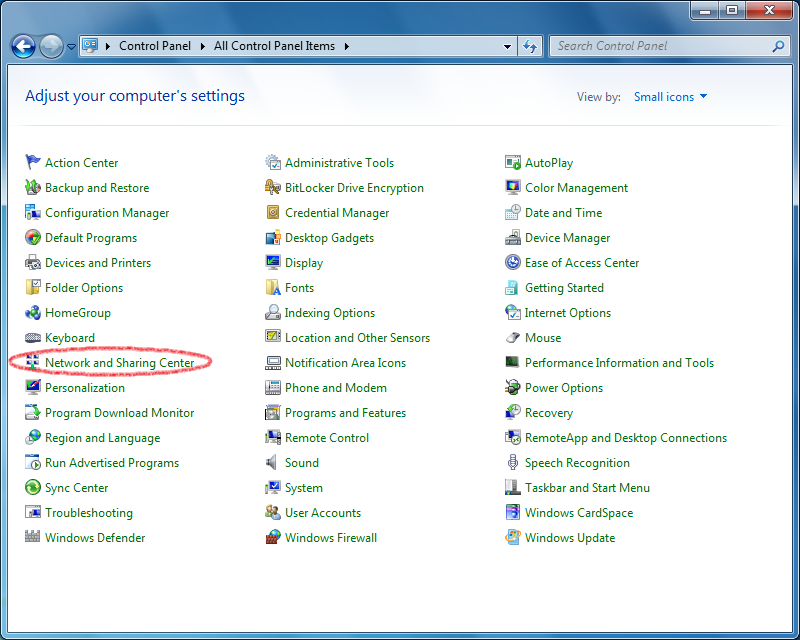
- In der Systemsteuerung wechseln Sie entweder über die "Category" Ansicht in "View network status and task" oder über die "all Control panel Items" Ansicht in das "Network and Sharing Center".
- Go to the Control panel and select "View network status and task" in the category view or "Network and Sharing Center" in the all Control panel Items view.
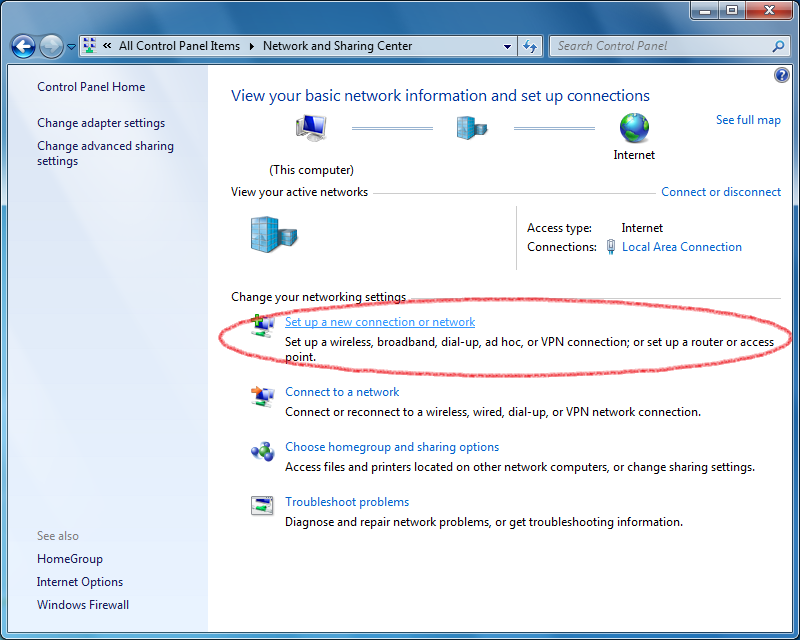
- Über "Set up a new connection or network" den Einrichtungswizard aufrufen.
- Create a new connection by clicking on "Set up a new connection or network".
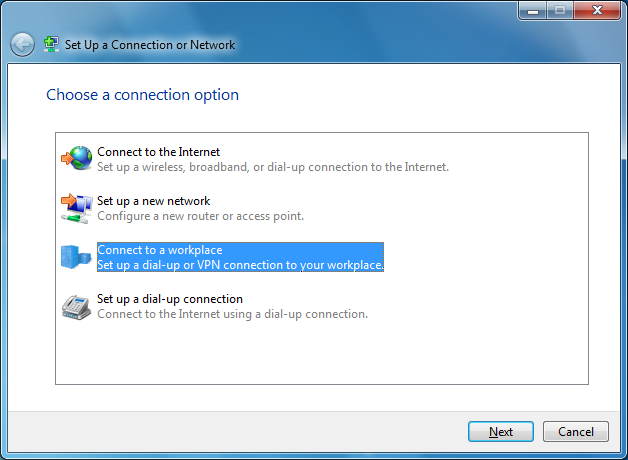
- "Connect to a workplace" auswählen und mit "Next" fortfahren.
- Select "Connect to a workplace" and click next.
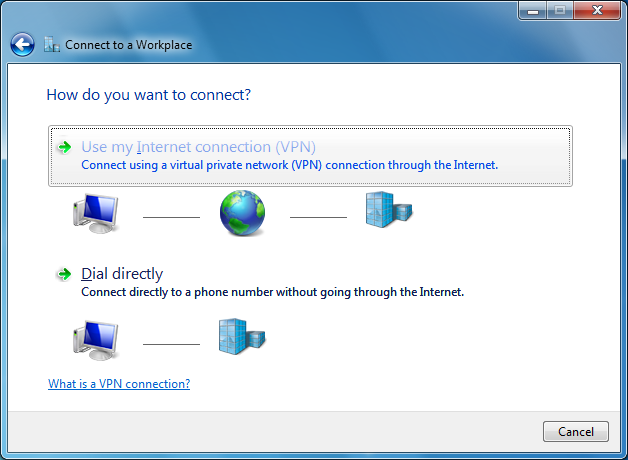
- Um nun die VPN-Verbindung einzurichten muss nun "Use my Internet Connection" ausgewählt werden.
- Now you have to select that you will "Use your Internet Connection".
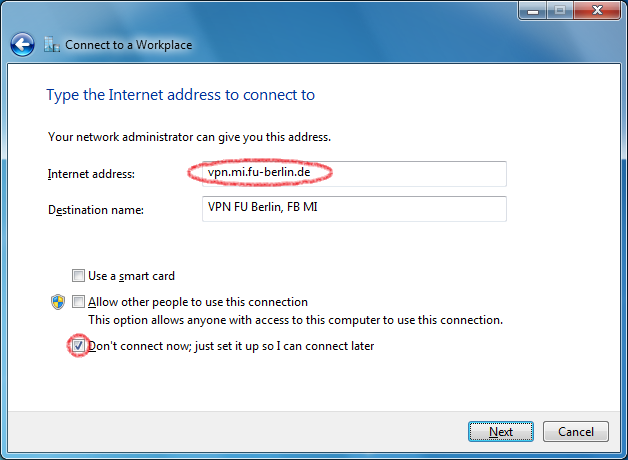
- Als Adresse * vpn.mi.fu-berlin.de* eingeben und der Verbindung einen Namen geben, z.B. VPN FU Berlin, FB MI.
"Don't connect now; just set up so I can connect later" auswählen, um nicht sofort eine Verbindung herzustellen. - Enter vpn.mi.fu-berlin.de in the Internet address field and name your connection. For example VPN FU Berlin, FB MI.
Select "Don't connect now; just set up so I can connect later".
- Hier den Benutzernamen und das durch MIPortal generierte VPN-Passwort eingeben.
- Enter your user name and your generated vpn password from MIPortal.

- Den Konfigurationsassistenten mit einem Klick auf "Create" beenden.
- Finish your configuration session by clicking on "Create".
Before you connect you have to change some further settings.
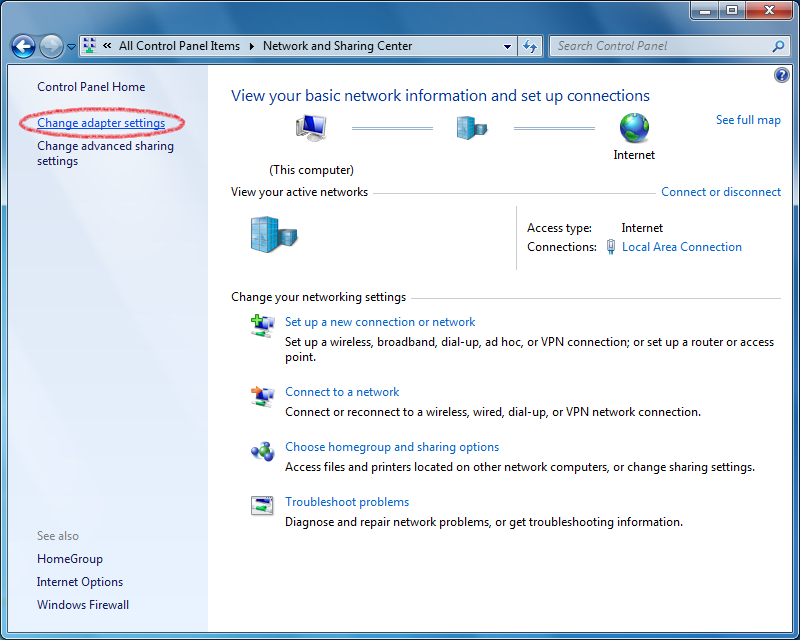
- Im "Network and Sharing Center" die Option "Change adapter settings" auswählen.
- In the "Network and Sharing Center" select "Change adapter settings".
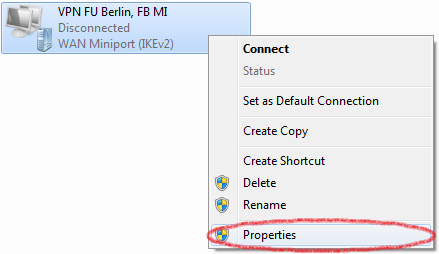
- Über einen Rechtsklick auf die neue VPN Verbindung die "Properties" aufrufen.
- Right-click on your new VPN connection and select "Properties".
- Im Reiter "Options" "Include Windows logon domain" abwählen.
- In the "Options" tab deselect "Include Windows logon domain".

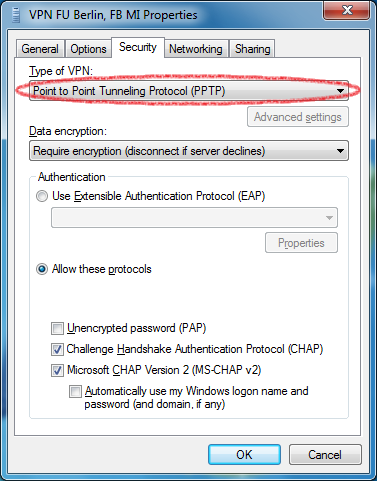
- Im Reiter "Security" den VPN Typ auf "Point to Point Tunneling Protocol (PPTP)" setzen.
- In the "Security" tab select "Point to Point Tunneling Protocol (PPTP)" as Type of VPN.
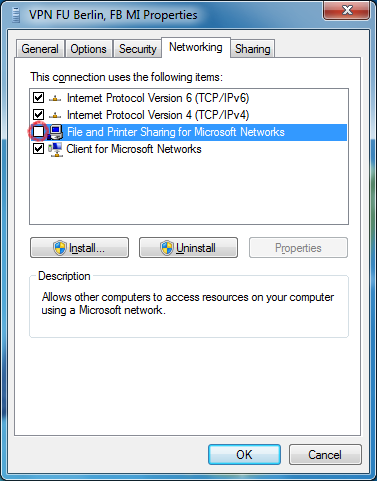
- Im Reiter "Networking" "File and Printer Sharing for Microsoft Networks" abwählen.
- In the "Networking" tab deselect "File and Printer Sharing for Microsoft Networks".
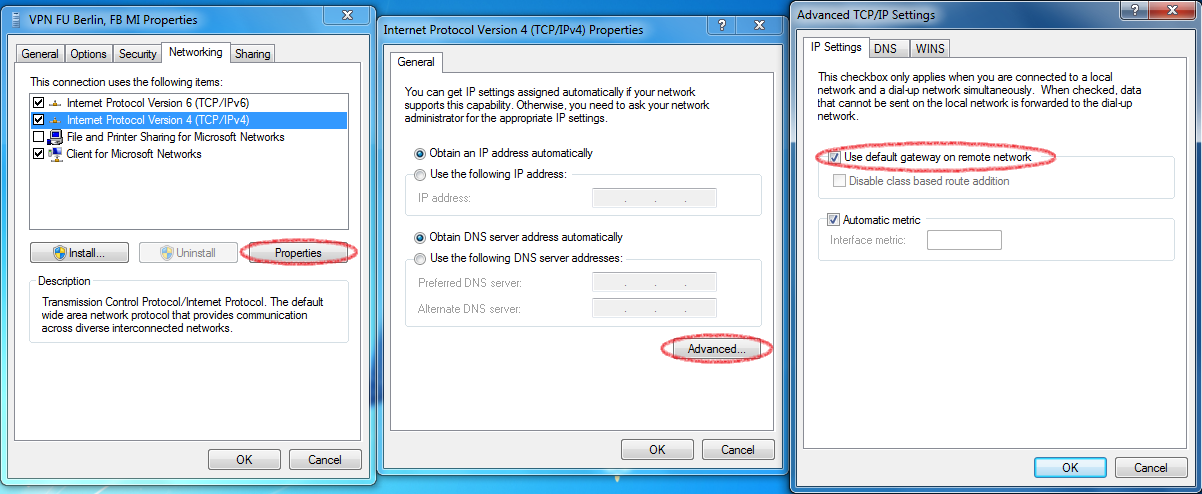
- "Internet Protocol Version 4 (TCP/IPv4)" auswählen und die "Properties" aufrufen
Auf die Schaltfläche "Advanced" klicken.
!!!Achtung!!!
Bitte unbedingt die Option "Use default gateway on remote network" aktiviert lassen. Diese Einstellung ist immer notwendig. - Select "Internet Protocol Version 4 (TCP/IPv4)" and press "Properties".
Click on the _Advanced button._
!!!Attention!!!
For the vpn connection it is necessary to keep the default option "Use default gateway on remote network".
How to recheck your connection
- Press Windows key + R to open the run window.
- Enter
cmdin the blank field to open the command shell.

- Type
ipconfig /alloripconfig -allto view the network configuration.

- Check the PPP adapter for the right IP address. The IP address should be from the range 130.133.48.0 - 130.133.63.254.

For advanced users only
Instead of the default gateway you can build your route manually. This is helpful if you use instant messaging clients and/or filesharing clients simultanously with the vpn connection. Therefore deselect the option Use default gateway on remote network . Open the command shell (run - cmd - enter) and type the following three lines sequently:route -p add 87.77.0.0 mask 255.255.0.0 130.133.52.242 metric 5 route -p add 130.133.0.0 mask 255.255.0.0 130.133.52.242 metric 5 route -p add 160.45.0.0 mask 255.255.0.0 130.133.52.242 metric 5 Important!
It is possible that an "Access denied" error occurs during login after configuring the VPN Connection. To solve that problem follow these steps:- Check the properties of the VPN-Connection (see instruction above).
- Next step is to search after the following filetype *.pbk .
- Open the file with notepad ( right-klick --> Open with...)
- Search for "UseRasCredentials=1" and replace with the following: UseRasCredentials=0
- Save and exit.
Comments
"Next step is to search after the following filetype *.pbk ." wo soll man denn bitteschön suchen? Und wieso ist das von MIPortal generierte Passwort bei mir nur 29-stellig? -- Main.Drake - 24 Jun 2012 Sicher, dass bei den .pbk files der Wert "UseRsCredentials" auf "?=0" gesetzt werden soll? Oder soll der Wert einfach nur auf 0 gesetzt werden? -- Main.romans - 04 Jan 2013Edit | Attach | Print version | History: r10 < r9 < r8 < r7 | Backlinks | View wiki text | Edit wiki text | More topic actions
Topic revision: r9 - 04 Jan 2013, romans
- User Reference
- BeginnersStartHere
- EditingShorthand
- Macros
- MacrosQuickReference
- FormattedSearch
- QuerySearch
- DocumentGraphics
- SkinBrowser
- InstalledPlugins
- Admin Maintenance
- Reference Manual
- AdminToolsCategory
- InterWikis
- ManagingWebs
- SiteTools
- DefaultPreferences
- WebPreferences
- Categories
Ideas, requests, problems regarding Foswiki? Send feedback