Installation on MacOS
OSX
Prerequirements:
- developer tools higher 3.8.1.
To find out the version use the commandline make --version - FTDI drivers for the communication with the usb interface
- Terminal programm of your choice. Like TerraTerm
- a virtual windows machine for programm upload
1. Cross-compiler Setup for microcontroller
Download all 5 programms linked below:
http://mirror.switch.ch/ftp/mirror/gnu/binutils/binutils-2.17.tar.bz2
http://mirror.switch.ch/ftp/mirror/gnu/gcc/gcc-3.3.6/gcc-core-3.3.6.tar.bz2
http://www.iam.unibe.ch/~anwander/mspgcc/msp430-gcc.tgz
http://www.iam.unibe.ch/~anwander/mspgcc/msp430-libc.tgz
http://www.iam.unibe.ch/~anwander/mspgcc/mspgcc-Makefile.patch
- upack and install binutils
With the following commands
tar -xjvf binutils-2.17.tar.bz2
cd binutils-2.17
./configure --prefix=/opt/msp430 --target=msp430
make
sudo make install
cd .. - extend the path to find the binutils
export PATH=$PATH:/opt/msp430/bin
close and reopen the terminal!!! - unpack the compiler programms
tar xvzf msp430-gcc.tgz - unpack and install the cross-compiler
tar -xjvf gcc-core-3.3.6.tar.bz2
cd gcc-3.3.6/
cp -R -L -p ../gcc/gcc-3.4/* .
./configure --prefix=/opt/msp430 --target=msp430
make
sudo make install
cd .. - unpack and install the libc cross compiler
tar xvzf msp430-libc.tgz
cd msp430-libc/src/
cp ../../mspgcc-Makefile.patch .
patch Makefile mspgcc-Makefile.patch
mkdir msp1
mkdir msp2
(edit Makefile ‘prefix’ if needed)
make
sudo make install
cd ../../ - cleanup
rm -rf binutils-2.17 gcc gcc-3.3.6 msp430-libc
2. Setup of ScatterWeb development software
Prerequirements:
Download the development software
- unpack ScatterWeb software
mkdir scatterweb
cd scatterweb/
unzip ScatterWeb2_Source_v1.1.zip - patch the config file here with vi ( any other editor will do too)
cd 1.1/System/
vi +81 makefile.application
comment lines 81,82,83
s
save and exit the editor and go back
cd ../.. - Compile demo application
cd 1.1/Applications/sd_sample/
make
The hex SDDEMO.hex file is now in the out sub-directory.
3. Setup Mac Driver
Prerequirements
http://homepage.mac.com/dalverson/zterm/ZTerm1.1b7.OSX.dmg
http://www.ftdichip.com/Drivers/VCP/MacOSX/UniBin/FTDIUSBSerialDriver_v2_2_10.dmg
Install both and restart your computer.
Connect the node through the debug device, (the olimex programmer must be disconnected), open zterm and select usbserial as serial port.
Change settings>connections as in figure
Turning up the node should print some messages.
You can try to interact by entering “id” followed by ctrl-m, ctrl-j, the node should print its ID.
Quit Zterm and answer YES to save the settings for the next time.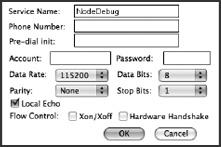
4. Prepare a virtual windows machine for file upload
Prerequirements:
USB Xpress
Unpack usb_flashing.zip and move the extracted directory to C:\
Start the installer USB Xpress Installer
Connect the flash-module to your computer and wait from the hardware wizard to ask you
for a driver.
Select advanced/manual mode and install the drivers from the USB Xpress install directory.
Restart windows.
Copy the out\SDDEMO.hex file from the previous part to the windows desktop in C:
\USBFLASHING\apps\.
Edit (add your hex filename) and run in a command prompt the file C:\USBFLASHING
\flash.bat to upload your image.
5. Create your own program
Now, you can copy and rename the sd_sample directory and start with your own project.
It is recommended to change the application name and to exclulde unused libraries in the
makefile. The main file is in the src directory and is named ScatterWeb.Process.c.
Often, the sd card is unused and you can remove the library from the library list and the
related lines in the main file.